‘Whiteboard’ style animation, where a hand draws an image in time with a voiceover narration, have been enjoying a surge of popularity over the last 7-8 years, mostly thanks to a wonderful series of films by Cognitive Media for RSA Animate. These ‘scribe’ type films are a perfect way of putting a lot of technical information across in a way that dramatically increases memory retention and audience engagement.
We’ve done a lot of these whiteboard films over the years, starting with ‘Hire the Barman’ in 2010, and more recently for Bayer, Salesforce and Lipton Ice Tea. In that time, we’ve experimented with a few different tricks and techniques, and come up with two favourite methods to suit different Client requirements.
The ‘real’ technique
The most obvious way of filming a hand drawing on a whiteboard, is to… film a hand drawing on a whiteboard.
Here’s how we do it:
- Create the illustration as a huge ‘map’ of how the final whiteboard will look once all the images have been drawn. Whiteboard films tend to work well when the camera zooms in and out, and parts of the image are re-shown or even re-drawn at later stages when they become relevant to the narration again, so there needs to be a lot of thought from the beginning deciding how the scenes will fit together on the board.
- Use the illustration to create an animatic, which fades on each image in time with the narration.
- Use a projector to faintly trace the first scene on to the whiteboard in pencil. This faint line will be invisible once the correct effects have been applied in post production, but it will also rub out when it comes in to contact with the hand, so be careful not to smudge it.
- Set up the lighting and camera rig. We find it easiest to have the whiteboard on the floor, rather than up on a wall, because most artists are more used to drawing on a vertical surface, and it causes less stress on the arms. It is important however that the artist doesn’t rest on the whiteboard with their knee or other hand, because this will depress the surface and cause a wobble in the footage.
- We use 2 lights – one either side of the camera, to minimise shadows on the hand. Ensure that the camera, tripod and artist are not casting shadows on the filmed area. The rest of the room should be blacked out so the lighting of each scene is identical.
- Ensure that the tripod is out of the way of the artist as they draw
- Check the white balance of the camera
- Film the artist drawing the scene, using the animatic to determine the correct order in which to draw each element
- Get the footage in to After Effects, and use time remapping to re-time it to the animatic.
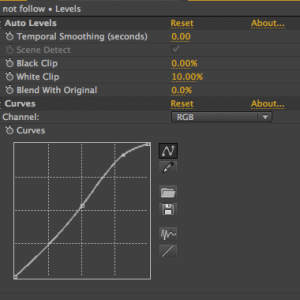
- Remove the pencil line. We use a combination of ‘AutoLevels’, which compresses the black and white as required, and then tweak the Curves graph to get the balance we want
- Repeat stages 3-7 until the entire film has been recorded and edited.
- Create a null or camera within After Effects to move between the footage as required.
The ‘cheating’ process
By masking an illustration to appear onscreen in time with a photo of a hand, we can create the illusion of drawing, while retaining control over the final image.
Here’s how we do it:
- Create the illustration as a huge ‘map’ of how the final whiteboard will look once all the images have been drawn.
- Use the illustration to create an animatic in After Effects, fading on each element in time with the narration.
- Change the transparency of the illustration to about 20%, and print out each scene.
- Film an artist tracing over the image – this footage will not be part of the finished film, so the quality and lighting doesn’t matter very much. It is used for timing reference and to understand how the hand looks as it draws the illustration.
- Get the footage in to After Effects, and use time remapping to re-time it to the animatic.
The masking:
- Duplicate each layer of the illustration
- Change the Track Mat of the lower layer to ‘Alpha Inverted’
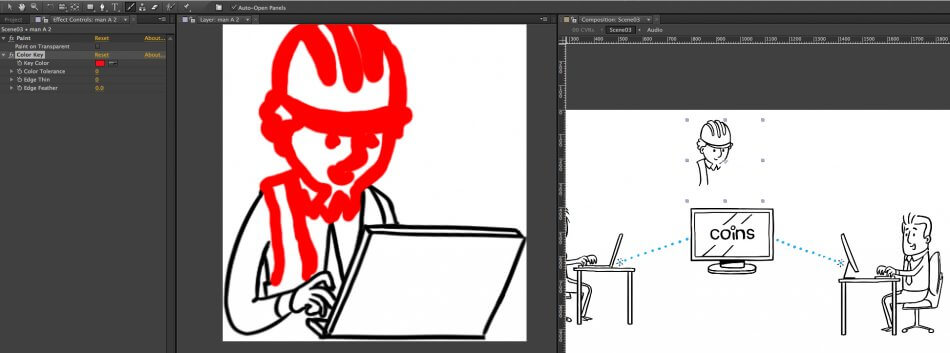
- Double click the upper layer to bring it up in the Layer Window, and use the Paint tool to paint over the illustration as it’s drawn by the hand in the reference footage.
- Once you’ve done the first frame, apply ‘Colour Key’ and use the Eyedrop tool to change the Key colour to the same as the paint colour. This is a little complicated to understand, but basically, you’re using the paint to create a mask, which is revealing the lower layer frame by frame. (Note – the Colour Key has to be below the Paint Effect in the Effects Control panel for this to work.)
- Go through the scene, using the reference footage to paint the drawing as it’s revealed frame by frame.
The hand:
- Set up a lighting and camera rig that allows you to take 15-20 photos of a hand drawing in different positions, ideally against a clean, single colour background. You may also need an index finger image (to press or point at things) and a thumb (to rub things out) etc.

- Remove the background on each hand
- Create a new composition in After Effects, make each hand image a single frame in duration, and place each hand on a separate frame on the timeline. Move the hand around to get the pen tip in the same place on each frame.
- Bring the hand composition in to masked scenes, and apply ‘Time Remapping.’ Put a Hold Keyframe at the start of the composition. You can now change which hand is visible by changing the time referenced.
- Change the visible hand, plus it’s position and rotation, to match the look and position of the hand in the reference footage for each frame.
- For any sequences that involve the ‘rubbing out’ or ‘pointing’ hands, use a separate version of the comp and apply the puppet pin to manipulate the finger or thumb.
- Duplicate the hand to create shadows, based on the lighting of the hand. We generally use 3 shadows rotated at a few degrees around the pen – one at 30% transparency and a gaussian blur of 10, one with 15% transparency and a gaussian blur of 20, and one with 7% transparency and a gaussian blur of 30. This effect is fairly subtle but dramatically increases the realism.
- Once the entire illustration has been masked, and the hand moved frame by frame to match it, remove the reference footage and use a camera or a null to move the scenes around as required.
Why choose different techniques:
In creating a film using the ‘hand drawing on a whiteboard’ technique, as opposed to the ‘masking/cheating’ technique, you are essentially sacrificing quality of final drawing for realism – no artist can draw as well under the conditions of filming as they can when given all the time and technology they need, and similarly no amount of cheating will ever give the viewer quite the same level of satisfaction as they get from watching a skilled artist draw.
The real method, when done well, is endlessly fascinating to watch.
The cheating method allows the client to approve the exact image that appears on screen. It allows that image to be more complicated and colourful, and creates the opportunity for little bits of animation to help bring the film to life.
Both methods have resulted in exciting and engaging films for our Clients, it just comes down to requirements and priorities when we choose which one to go for!
And here’s another take on the style, created for a recent BBC World War 1 Uncut episode ‘Why did Soldiers use trenches’ where we drew on a blackboard instead. Revolutionary!