Rendering, in the most basic terms, is the process of turning an editable animation file in to a watchable, shareable film.
It is a process (sometimes a very time consuming and RAM heavy process) that packages together the visual file, the audio file and any additional files (like subtitles) in to a package or container that can be uploaded, shared, or watched by anyone. Containers for video files include .mov, .avi, and .mp4 – each of which have their own advantages and disadvantages.
Rendering also allows us to apply compression, which sacrifices quality for smaller file sizes. This involves wrapping each part of the file up in a codec before putting them together in the container. Codecs include H264, DV25 and ProRes 422 – and each one will encode the files in a way that prioritises quality, file size, speed of render or something else entirely.
It’s highly likely you’ll wind up rendering everything twice – once will be each individual scene coming out of the animation software (be it After Effects, Adobe Animate (aka Flash), TVPaint, Toon Boom or whatever else), and once will be the entire film coming out of the editing software (be it Premiere, Final Cut Pro, etc). You want to render at the highest possible quality out of the animation software – this has 2 advantages:
- You will be editing an uncompressed version of the file
- You will only compress – and therefore reduce quality – once
Then when you render out of the editing software, you’ll want to create at least 2 versions of the film
- A high quality one to use as a back up, and to future proof the film as much as possible
- A small file size one to upload and show
There are hundreds of different render settings, codecs and containers that can combine to get the desired outcome for each project and client – we’re going to discuss some standard settings and the reasons why we render in a particular way across the vast majority of our films, but still recommend you spend some time playing around with different settings and see what produces the best result for your film.
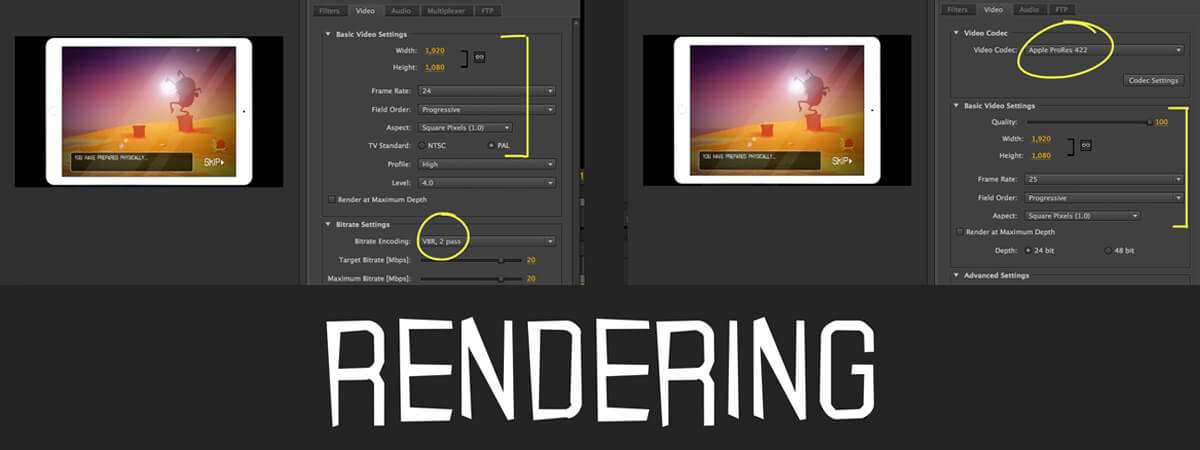
For those of you not following the above illustration:
Lesson 1:
You always want to render your animation scenes at high quality out of After Effects/ Animate/ Toon Boom etc so you’re editing with thte highest quality version possible in Premiere.
- After Effects
In the Output model in AE, select ‘Quicktime’ from the format box, change the codec to Apple ProRes 422 or Animation under ‘Format options’, press OK and hit render. If you don’t have the Quicktime option, you’ll need to download it for free. - Animate
File > Export > Export Movie, then export the film as a .png sequence (make sure you have a folder ready, as this will generate a huge amount of images)
Lesson 2:
Edit the film and add the audio in Premiere or another piece of specific editing software. Use the ‘Effects Controls’ panel to make adjustments to scale, position, volume etc of each clip if necessary, and apply transitions between scenes here.
Lesson 3:
Render two versions of the film (File > Export > Export Media) with the following settings:
H264 will be a small file and reasonable quality, good for: 1) Sharing online, 2) Uploading to festivals, 3) Putting on USB drives. However, it is bad for: 1) Further editing, 2) Using as a back up.
ProRes/Animation will be a large file and perfect quality, good for: 1) Further editing if necessary, 2) Using as a backup, 3) Future proofing. However, it is bad for: 1) Showing people generally.
Lesson 4:
Go to Vimeo, and upload the file. Under Edit Settings > Privacy, you’ll be able to add a password.


